Kitchen Counter Organization Ideas for Easy Hosting
Your kitchen counter does double duty every time you host — it’s where you chop, plate, and stage dishes, and it’s the first surface your guests scan when they walk in. A cluttered countertop signals chaos before anyone has even tasted the food.
The right kitchen counter organization ideas turn that surface into a hosting asset, giving you room to work, a clean visual for arriving guests, and the confidence to cook without hunting for a buried spatula.
We will help you organize your counters around the way you actually cook and entertain — not around what looks best in a catalog photo.
At a Glance
- Kitchen counters organized into zones — prep, cooking, and staging — reduce hosting stress and speed up meal service.
- Vertical tools like shelf risers and stackable shelves reclaim counter space without removing anything you use daily.
- A utensil crock near the stove and a designated spot for oils keep your most-used ingredients within arm’s reach during active cooking.
- Clear containers and bread boxes store pantry staples on the counter while keeping visual clutter low for guest-facing surfaces.
- A 10-minute counter reset before any gathering creates a clean cooking space and a welcoming first impression.
What Is Kitchen Counter Organization?
Kitchen counter organization is the practice of arranging your countertop surfaces so every item has a purpose, a place, and a clear reason to be visible. For hosts who cook and entertain at home, it goes beyond tidiness — a well-organized counter means you can shift from chopping vegetables to greeting guests without losing your rhythm. Unlike general kitchen storage, counter organization specifically addresses the surfaces your guests see and the workspace you depend on during active food preparation.
Why Your Kitchen Counter Is the First Thing Guests Notice
The moment someone walks into your kitchen, their eyes land on the counters. It’s instinctive — countertops sit at eye level, stretch across the room’s widest sightline, and reflect how the entire space feels. A stack of mail next to the toaster oven tells a different story than a clean surface with a marble tray holding olive oil and salt.
This matters for hosting because your kitchen counter is both your backstage prep area and a guest-facing surface. You need room to work, but you also need the space to look intentional.
The way you set the scene for a dinner party starts well before the table — it starts with what your guests see when they step through the kitchen door.
Think about the smells, too. A counter cluttered with plastic bags and takeout menus traps odors and hides the scent of whatever you’re cooking. A clear counter lets the aroma of roasting garlic or fresh herbs reach your guests the moment they walk in — and that sensory first impression matters more than most hosts realize.
- Clutter-free kitchen counters set expectations: Guests who see a tidy counter assume the meal will be just as well planned. Real Homes’ guide to decluttering kitchen countertops reinforces this — visual calm in the kitchen signals control over the whole evening.
- Counter space affects your cooking pace: When every square inch is occupied, you end up stacking cutting boards on top of mail and balancing plates on the edge of the sink. That slows you down when speed matters most.
- Small kitchens amplify the problem: In a small kitchen, the counter might be the only flat surface. If it’s overrun with small appliances and decorative items, you’ve lost your only workspace. Reader’s Digest outlines several strategies for keeping counters organized even when storage is tight.
Professional organizers often recommend the “landing zone” test: if an item doesn’t serve a daily cooking function or contribute to the room’s visual warmth, it migrates to a cabinet or a shelf. That single rule clears more counter space than any organizer bin.
Start by walking through your kitchen with fresh eyes — not as the person who lives there, but as the guest arriving for dinner. The best kitchen counter organization ideas don’t start with buying new products; they start with deciding what deserves to stay.
|
🍽️ Plan Your Counter Setup Before the Next Dinner Party |
How Should You Zone Your Countertop for Cooking and Hosting?
Zoning is the single most effective counter organization strategy, and it’s borrowed directly from professional kitchens. Instead of spreading items randomly across every surface, you divide your countertop into distinct areas based on function — and you commit to keeping each zone stocked with only what it needs.
Living Cozy’s counter organization breakdown walks through this principle room by room, and the logic translates directly to any hosting kitchen.
A standard three-zone approach works for most kitchen layouts:
- Prep zone: Near the kitchen sink and your main cutting board. Keep a utensil crock with your most-used cooking utensils — a chef’s knife, tongs, a wooden spoon — and a small dish for scraps. This is where food preparation happens, so counter space here is non-negotiable.
- Cooking zone: Adjacent to your stove or cooktop. Station your olive oil, everyday essentials like salt and pepper, and a spice rack within easy reach. A lazy Susan works well in a corner to hold bottles without sprawling across the surface area.
- Staging zone: The section closest to your dining area or pass-through. During a dinner party, you plate dishes here before serving. Keep this zone empty by default so it’s ready when you need it.
The hosting advantage of zoning is speed. When your cooking utensils live in the prep zone and your oils stay in the cooking zone, you stop crossing back and forth across the kitchen space. That saves you minutes during active cooking — minutes you can spend with your guests instead.
In our experience hosting, we’ve found that even a narrow galley kitchen supports two clear zones if you’re strategic about what stays on the counter versus what moves to upper cabinets.
One detail that makes a difference: position your coffee maker and toaster oven in a dedicated spot outside the three main zones. These kitchen appliances get daily use but don’t need prime prep real estate. A corner near an outlet, ideally with a stackable shelf above to hold coffee mugs, keeps them within easy access without crowding your workspace.
When every item has one of these proper places, the whole counter feels calmer — and that calm carries over into the way you cook.
If you regularly host brunches, a cook-ahead dinner party menu frees up even more counter time by shifting prep to the day before.
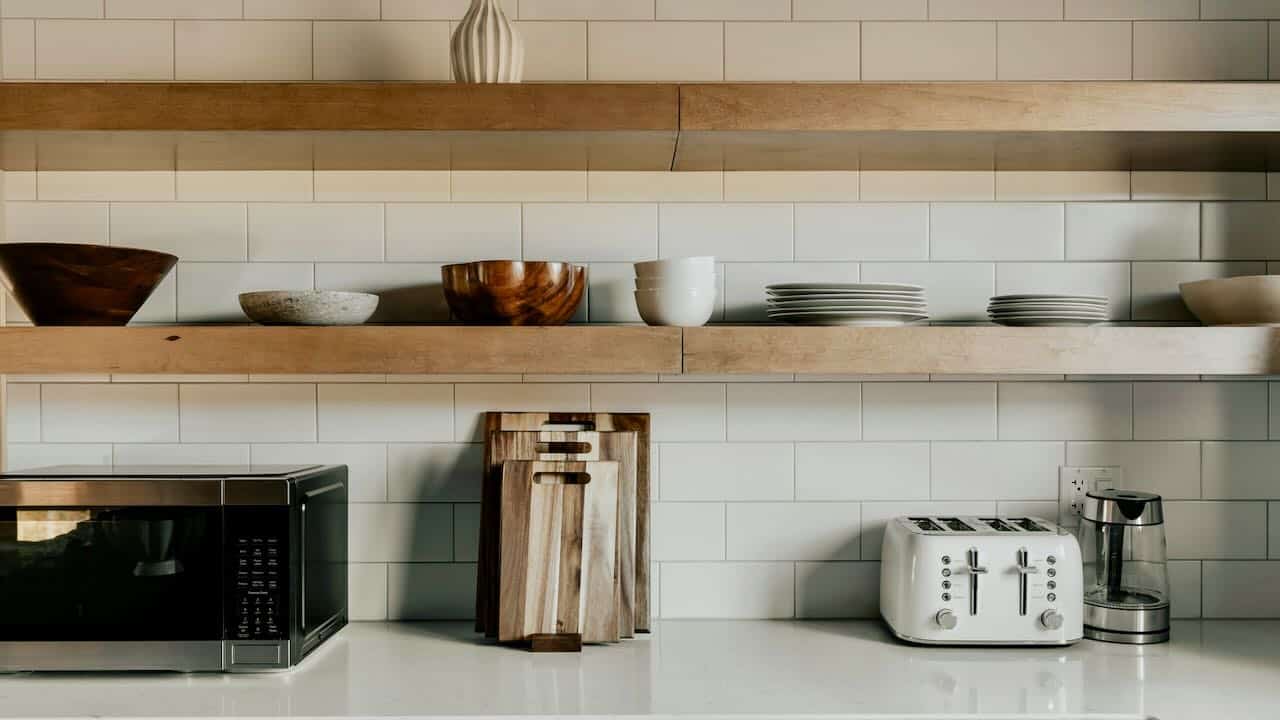
Vertical Space and Shelf Risers That Free Up Counter Room
Most countertop organization advice focuses on what to remove. The faster win is looking up. Vertical space is the most underused resource in any kitchen, and reclaiming it costs less than a dinner out.
Shelf risers — simple U-shaped or stacked platforms — instantly double the usable area on a section of countertop. Place a shelf riser above your coffee station to stack coffee mugs on top while keeping the maker accessible below. Use another above the cooking zone to hold spice jars or small items that would otherwise spread across the surface.
Real Homes’ roundup of countertop organization strategies highlights risers as one of the highest-impact, lowest-cost solutions available.
- Stackable shelves near the stove: These create a second tier for everyday items like olive oil, vinegar, and cooking spray. One stackable shelf can hold six bottles in the footprint of two.
- Wire baskets mounted to the wall: Perfect for corralling small appliances like a hand mixer or storing larger containers of dry pasta and dry goods that look too bulky on a flat counter. Swap flimsy food storage containers for uniform glass or acrylic versions that stack cleanly on a riser.
- Magnetic surfaces on the backsplash: A magnetic knife strip or magnetic spice rack frees up drawer and counter space simultaneously. They also put your kitchen counter organization tools in plain sight, right where you need them.
The hosting payoff is immediate. Before a gathering, you don’t need to shove everything into cabinets — your vertical storage already keeps the counter visually clean. Shelf risers and wall-mounted racks create depth without clutter, which makes a small space feel more open and more considered.
If your kitchen cabinets are full and your upper cabinets have no room, vertical solutions on the counter itself are the most practical path to extra space. Knowing which ingredients belong in a well-stocked kitchen helps you decide what deserves prime counter placement versus what should live in a cabinet.
A two-tier shelf riser takes up eight inches of counter width and gives back eight inches of raised storage — a net gain that makes food preparation during hosting far less cramped.
|
📨 Hosting Organization Tips, Delivered Weekly |
Containers, Crocks, and Stations That Work While You Cook
The right container on a countertop earns its space by keeping something visible, accessible, and out of the way at the same time. The wrong container just adds visual noise.
Clear containers are the workhorse here. A set of glass or acrylic canisters holding pantry staples — flour, sugar, dry pasta, rice — keeps those items within arm’s reach while cutting down on the open-bag clutter that accumulates near the stove. You can see exactly how much you have left, which means fewer last-minute trips to the store before a dinner party.
The Spruce’s counter organization guide ranks clear canisters among the top kitchen counter organization tools for both function and appearance.
- Utensil crock placement matters: Position it within arm’s reach of both your prep zone and your stove. A ceramic or stainless crock holding your top five cooking utensils beats a crammed kitchen drawer every time. You grab what you need without opening anything.
- Bread boxes aren’t just for bread: A bread box hides store items that you want accessible but not visible — snack bags, tea boxes, vitamins. It’s a single container that tidies an entire category of small items in one move.
- Olive oil and vinegar on a marble tray: Grouping your most-used cooking oils on a small tray contains drips, creates a visual anchor, and makes the counter look intentional instead of scattered. Swap the tray contents seasonally — chili oil in winter, herb-infused oil in summer — and it doubles as a decorative touch that guests notice.
A dedicated coffee station deserves its own mention. If you drink coffee daily, the coffee maker, mugs, and grounds will live on your counter regardless. Containing them — a tray underneath, a stackable shelf above, coffee mugs hung on hooks — turns a functional cluster into an intentional station that’s ready when guests arrive for brunch or after-dinner espresso.
Taste of Home’s kitchen storage ideas features several station setups that balance daily convenience with hosting-ready presentation. If you want to take the presentation further, pairing a tidy counter with thoughtful table setting ideas creates a seamless visual flow from kitchen to dining room.
Interior designer and kitchen organizer Shira Gill has noted that the most functional kitchens follow a “one arm’s reach” principle — if you have to take more than a step to grab something you use every day, it’s stored in the wrong spot. The principle behind every container choice is the same: store items where you use them, not where they fit. A spice rack next to the stove, a crock next to the cutting board, and clear containers near the pantry door.
Martha Stewart’s best tips for organizing your kitchen emphasize this proximity rule as the foundation of any system that actually lasts.
This approach keeps similar items grouped, reduces the time you spend searching during a kitchen task, and means your countertop works for cooking instead of just holding things. TGH’s Plan the Meal resources cover the full sequence through prep, cooking, and plating.
|
🏡 Set Your Serving Platters Out Before You Start Cooking |
The 10-Minute Counter Reset Before Any Gathering
Every organized counter eventually drifts. Mail lands next to the cutting board, grocery bags pile up near the kitchen sink, and yesterday’s coffee mugs linger by the coffee maker. The fix isn’t a weekend overhaul — it’s a short, repeatable reset that you run before any gathering.
Here’s the process, designed for 10 minutes or less:
- Clear everything that doesn’t belong: Walk the counter end to end. Anything that isn’t a daily-use kitchen tool, an active cooking ingredient, or a container in its designated spot goes into a basket or back to its proper place. This step alone clears most of the visual clutter.
- Wipe every surface: A damp cloth across the full counter takes 90 seconds. You’re not deep cleaning — you’re removing crumbs, coffee rings, and the oil film that builds up near the stove. Guests notice the shine.
- Reset your zones: Slide your utensil crock back to its proper place, align your containers, and make sure the staging zone is completely empty. This is the space where you’ll plate and serve, so it needs to be clear.
- Do a quick appliance audit: If the air fryer or toaster oven isn’t needed for tonight’s menu, tuck it into a cabinet or an appliance garage. Reclaiming that counter space for one evening makes the cooking space feel twice as large. Reader’s Digest kitchen organization guide includes a similar audit approach focused on removing anything that doesn’t serve tonight’s specific menu.
- Stage one intentional display: A small bowl of citrus, a vase with a single stem, or your best olive oil on a tray. One item that signals “this kitchen is ready” without adding clutter.
The hosting benefit of this reset isn’t just visual. When you walk into a clean, zoned counter 30 minutes before guests arrive, your stress level drops. You know where your tools are, you know where your food will land, and you know you have enough space to cook without improvising. That confidence shows in your pace, your conversation, and the food itself.
We once hosted a holiday dinner where three desserts needed plating simultaneously — a tart, a custard, and a cheese board. Because the staging zone was clear and the prep zone was reset, every dish landed on its platter without shuffling a single item. The whole sequence took four minutes. Without the reset, it would have been plates balanced on stovetop burners.
Pairing a clean counter with the right ambiance — lighting, music, and scent turns a functional gathering into a genuinely inviting one. And if you’re hosting a crowd, having a party food platter strategy means your staging zone does double duty as a serving surface.
On a daily basis, a shorter version of this reset — just steps one and two, taking three minutes — keeps the counter from ever reaching the point where a full reorganization feels necessary. Small resets prevent big messes, and a countertop that stays organized on Tuesday is already hosting-ready by Friday.
Frequently Asked Questions
Assign every item a zone — prep, cooking, or staging — and return each piece to its designated spot after every use. Run a 10-minute reset before hosting events and a 3-minute version daily. The habit of clearing your counter each evening prevents accumulation from turning into a project that requires a full afternoon.
Keep only the appliances you use daily or several times a week — typically a coffee maker, toaster oven, and one prep tool like a stand mixer. Move seasonal or occasional appliances like an air fryer into a cabinet or appliance garage when they’re not in active rotation for that week’s meals.
Use vertical solutions on the counter itself. Shelf risers, stackable shelves, and wall-mounted wire baskets add storage tiers without claiming more surface area. A magnetic strip on the backsplash holds knives and spice tins, freeing up drawer space for items that currently crowd your countertop.
Divide the counter into three functional zones: prep near the sink, cooking near the stove, and staging near the dining area. Keep each zone stocked with only the tools and ingredients it needs. This approach prevents items from migrating across the counter and ensures you always have clear workspace where you need it.
Only if you use it at least four times a week. A toaster that sits idle most days takes up prime counter space that could serve food preparation or staging. If it earns its spot through daily use, position it in a dedicated corner with a stackable shelf above to maximize the vertical footprint.
Reduce the number of items sitting directly on the surface. Use shelf risers to stack vertically, group similar items on a tray to create visual boundaries, and keep the staging zone completely empty. Clear containers look lighter than opaque ones, and a single intentional display — a bowl of lemons or a small plant — reads as spacious rather than cluttered.
Continue Reading:
More On Kitchen Organization Hacks
- Cleaning Hacks for Kitchen That Save Time and Effort
- Kitchen Organization Hacks That Keep Your Space in Order
- Kitchen Organization Pantry Ideas for Easy Storage
More from The Gourmet Host
- 7 Creative Table Setting Ideas For Your Next Dinner Party
- How to Create Ambiance at Home For Your Next Gathering
- Essentials Series: Ingredients for a Well-Stocked Kitchen
- Cook-Ahead Dinner Party Menu: Make It All in Advance
- Party Food Platters: Build Boards for Any Gathering
Explore TGH Categories